
Before Webshots I used Photobucket for a time

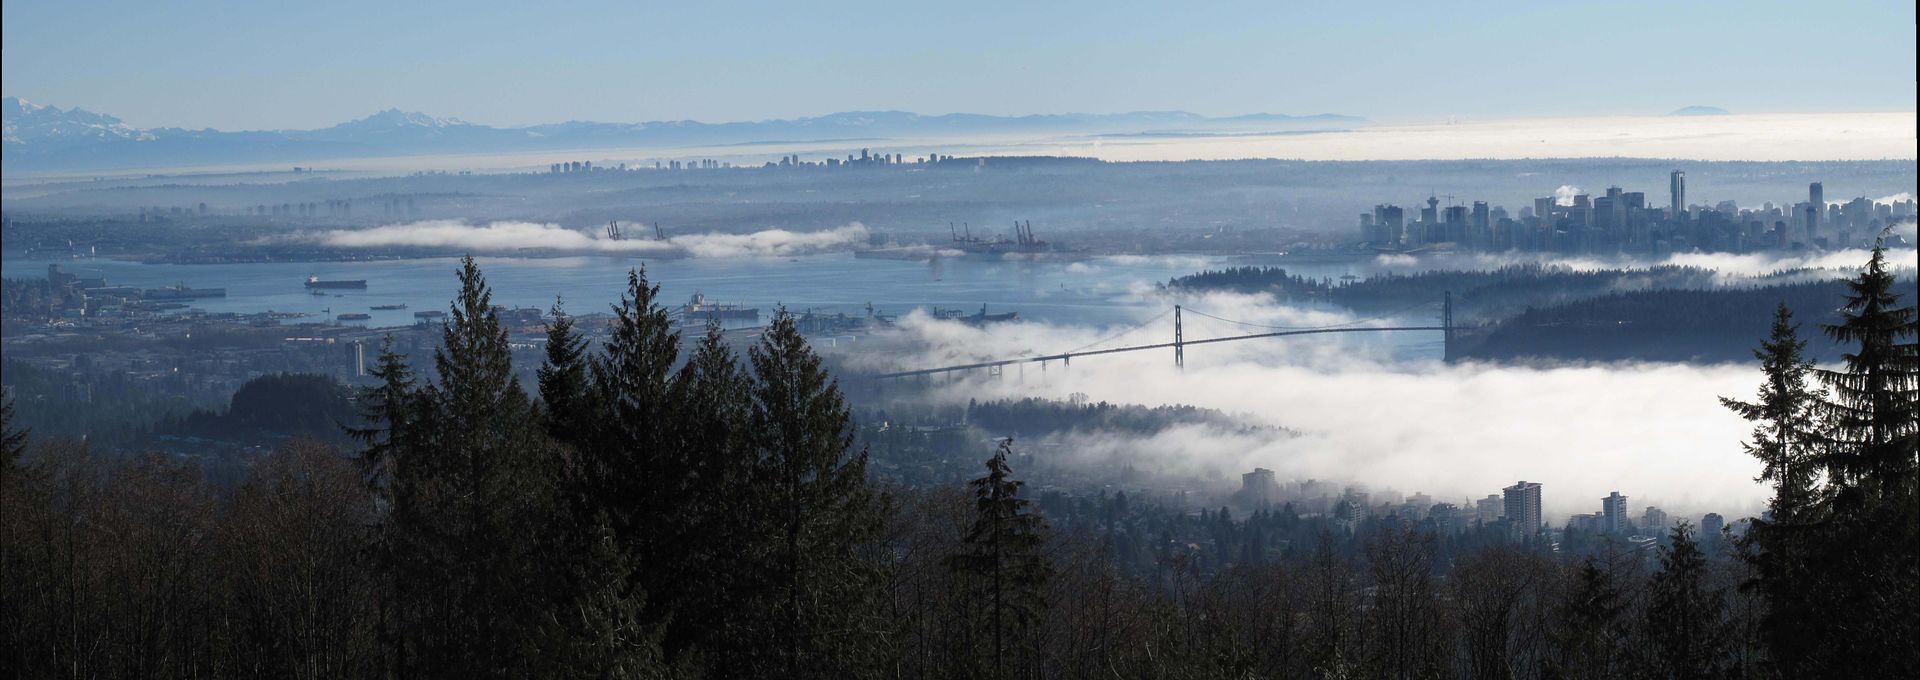
Cypress Mountain Lookout, West Vancouver, BC December, 2008
click HERE for larger size. This was taken Christmas week December 2008. I can't remember what camera was used but I would have used Autostitch as the pano software. This was produced from 3 photos using the zoom
A novice would consider a panoramic photo to mean a greater angle of view, perhaps up to 180°. A super wide angle lens would probably approach 45° . My rotating film cameras revolve to 140° which is nearly as much as your eyes can see left to right. In photographic terms, a photographer would consider any image with an aspect ratio larger than 3:1 to be panoramic (width/height) So while the photo above is only around 12-15 degrees, it is a panorama by general concensus to most photographeers
Consider the panoramic mode of most modern cameras. Yes, my Sony has Sweep Panoramic mode but I seldom use it. I don't have full control of where the image starts, nor stops. It is trial and error. Here is one I took this morning before lunch

While I am able to set the lens to any focal length, most automated P&S cameras default to their widest angle, which isn't good as it creates distortion on close horizontal elements. The best is to set your focal length to at least 45 mm as this approximates normal human perspective. I have a prime 16mm lens to mimic what an automatic camera would do

Sure you can crop this image and get a panoramic perspective but what if you wanted to make a huge enlargement to hang on the wall ? You wouldnt have enough pixels to do the job
Okay, Now I zoomed my lens to 180mm (approx 280mm equivalent) , took 5 images and stitched them using Microsoft Research I C E and here is what you get. I used manual focus and Manual exposure mode to minimize colour shift

I didn't have time to remove the power lines but you get the idea.
Below is a quick video clip to show you the location. I wanted to take a panorama of Vancouver from this vantage point
I snapped 16 shots all at full 18 MP resolution in two rows left to right, but direction doesn't matter if you use I C E or autostitch, and I dragged these 16 images over to ICE from Windows Explorer

Here is the screen shot from ICE. Notice that the image size is 78 megs in size before cropping. Autostich does not crop so you need another photo editor. I have to keep images sizes low for my free hosting websites so I scale it down and then reduce it more for posting. But if you wanted to print a large photo to frame this would be a good solution to a low megapixel camera

I move the bounding lines for the crop and now the image has reduced in size to 53 megs. Having to crop is a function of taking photos "hand held" and not being horizontal, thus the image has "blank" spots without an image. If I shot another horizontal row below the horizon then the image could have been larger, with less cropping

Here's the greatly reduced output

It was a beautiful day today and we took my Aunt out for lunch and a ride to Crescent Beach, BC

I'm not fond of crows but here they are sitting on the fence in Mud Bay

and here is the fence to nowhere. I was enamoured with the ripples on the water.
Another nice day on the West Coast of British Columbia. A bit chilly by the water but the sun was out and another day with no rain, Oh . . . our fog has gone away
Nice pics Bob skoot,
ReplyDeleteLike the one of the ocean coming into shore, you've got a lot into that picture .
Also the iPhone pic is quite good ..... Very handy these iPhones aren't they.
Kind regards
Len
Len:
DeleteI consider my iPhone more of a pocket computer rather than a phone and it's a good camera too.
Everyone knows to send me text messages or email as you can't answer whilst riding. One day it may ring and I won't know what to do
"The best is to set your focal length to at least 45 mm as this approximates normal human perspective"
ReplyDeleteWith and APS-C (23.6 x 15.8 mm) sensor, would this focal length be 45mm/1.5 or about 30mm?
I like to do panoramas as well though the Nikon makes it difficult to lock focus and exposure while shooting as the button is poorly placed. I Usually avoid manual as I tend to forget to set it back after the shot, then the next couple of pictures get messed up. This is a great summary and I'll try it once I get my Windows 8 computer.
Richard:
Deleteour actual field of vision in photographic terms is actually 43mm (in 35mm equivalents)
Read about half way down
http://www.bhphotovideo.com/c/find/newsLetter/The-Photographic-Eye.jsp
and we can normally see 120-140° so panoramas are sort of how the real world look to us
When cameras were first manufactured, the standard lens was 45mm but they eventually settled on 50mm as the industry standard, over time which is a bit telephoto. When you use a wide angle lens and you are not shooting completely horizontal, then the horizontal lines will not be "level" but will bend either concave or convex. Try a 20 mm lens and point your camera up or down and you will see the distortion. If you try to stitch frames which are distorted, then the transition to each photo will not blend seamlessly. That's why they recommend setting your focal length to around 43mm which is loosely 30mm on APS-c sensors.
For many years I used to snap 3 image panos. I have many shots like this taken many years ago before I knew how to stitch them together but I took them anyway. One day I can try to find them and edit them together. In the days of film I used to take multiple images, get them developed and then just tape them together and them would be panos by the scrap book method.
It is important to take all photos at the same settings: ISO, shutter speed and aperature as this will affect colour balance between frames. If you only shoot 3 image panos, here is a trick I used to do.
Snap the middle one first in full auto mode and DON"T move your camera. The focus again and line up the left side, with a bit of overlap. Then go back to the middle again to compose and lock focus/exposure and then snap the right one. Make sure you have a point of reference using your focus point. Hope this helps.
I used to have Nikons. Hold the AE/FL with your right thumb and set lens to manual focus and snap away. That way you don't have to contort your left hand too
I know what you mean about forgetting to reset your Camera. When Dave was here I shot a couple of Remote shutters but I usually set my lens to manual focus as then I don't have to stand where the focal target is. Then later I was shooting more photos and then I noticed my lens wasn't focusing. My fault . . . For group photos whenever I use remote control I always set the focus manually.
Which Win8 computer --> the Lenovo looks good. Can't remember the model number but I saw them on sale a few days ago. I notice some computers now come with the free WIN7 downgrade option. Can these be dual booted ? Just wondering
I always found the tiny AE lock button too small sitting next to the viewfinder. I've done some panos the way you suggested and but I tend to forget to look at where I started i.e. what is at the edges of the frame.
DeleteI was thinking of picking up a Lenovo Helix as it has a very long battery life as the keyboard acts as an external battery and will work as a tablet as well. It looks like a slick system and I figure that I can't bad mouth Win 8 too much unless I've tried it myself.
Just about anything can be dual booted except maybe an iPad. A colleague has a Windows tablet that dual boots to Win 8 and Ubuntu.
Richard:
DeleteThe trick when doing the 3 photo method is to notice where your focus point is pointing at so you have a reference. If you use ICE or Autostitch just machine gun two or three horizontal rows and that should do it. I like ICE better as cropping is included with the interface. Just change the scaling box for smaller file sizes
I was going to buy a new Ultrabook before my next trip, in the meantime I picked up a Nexus 7, ver 2. and I really like it. I installed the blogger app but I don't know if you can add more than one photo per post. I also bought the Kingston Mobilelite which creates its own WiFi network so I can transfer photos from an SD card directly to a USB pocket drive without using a computer. This is working great as now I don't need to buy a WiFI camera
Here's the Lenova Yoga, they even have an 11.6" version
http://www.futureshop.ca/en-CA/product/lenovo-lenovo-ideapad-yoga-13-3-touchscreen-ultrabook-grey-intel-core-i5-3337u-128gb-ssd-8gb-ram-yoga-13/10238486.aspx?path=2abf7e2391a49c60c9b1aa60883ce6fben02
I'm not techy so I don't really "get" all of the info, but I love the photos. I just point and shoot. ;)
ReplyDeleteYou do a far better job at it though. Beautiful!
Smooches,
Sash
www.SashMouth.com
Tina:
DeleteYou don't have to be techy. Just Point & Shoot. Look at a scene you want LONGER than normal. Shoot the middle one first and try to notice where to shoot the LEFT one, then the RIGHT one. Drag the 3 photos into ICE and when it is finished, drag the crop lines to square it off. Easy Peasy.
Did I mention that ICE is a FREE download ?